Loading Data
As you saw in the Overview Chapter, Arches-HIP is designed to allow you to create inventories of cultural heritage. With HIP, you can import heritage data from a simple (but powerful) text file or from your GIS using a shapefile. If you prefer, you can use the HIP’s data entry forms to create heritage records.
Before You Start
There are a just few things to understand before you start building your cultural heritage inventory. First, Arches-HIP implements the following six resources for cataloging cultural heritage:
- Activity.E7
- Actor.E39
- Heritage Resource.E18
- Heritage Resource Group.E27
- Historical Event.E5
- Information Resource.E73
You saw in the Chapter on Arches-HIP Data Resources that each of these resources (or inventory record types, if you prefer) comes with a set of attributes, some of which are treated as domains or “Controlled Vocabularies”.
A Note on Controlled Vocabularies and Authority Files
Let’s look at the idea of controlled vocabularies in a bit more detail. Consider the following problem:
You have people creating cultural heritage data, specifically information about buildings. You want to ensure that all your data are created consistently and wish to use just an approved list of possible terms to describe the architectural style of a building. For example, you want all the data creators to select a style from the following list: “Craftsman”, “Beaux Arts”, “Bauhaus”. How do you do this?
Arches-HIP requires that you decide on the list of terms (we call them controlled vocabularies) that you will use to ensure your heritage data are created and managed using just the terms that you approve of. In Arches, controlled vocabularies may be simple word lists such as “Good, Fair, Poor” to describe the condition of a building. Or a Controlled Vocabulary could be a poly-hierarchical, multi-lingual thesaurus. You may decide just how sophisticated your controlled vocabularies need to be to support your cultural heritage data management needs.
Arches-HIP supports several methods for implementing your controlled vocabularies. You can define controlled vocabularies using an Authority File. As you saw in the last chapter, Arches-HIP includes a number of Authority Files, one for each controlled vocabulary. Alternatively, you can build your controlled vocabularies interactively using Arches’ Reference Data Manager (RDM)
Preparing Arches: Creating and Loading Controlled Vocabularies
Before you can start creating or importing cultural heritage data with Arches-HIP you will need to create and load the controlled vocabularies that you’ll use to ensure consistent data entry and retrieval. You have several options to create the controlled vocabularies:
- Review the authority files that come with Arches-HIP. These files provide very general terms for each controlled vocabulary and show how you to format a term for loading into HIP.
- Use the Reference Data Manager (RDM) to create the terms you wish to use for each controlled vocabulary. The RDM provides easy-to-use data entry forms that will let you quickly create the terms you want to use for each controlled vocabulary.
You may wish to check the Arches Project website (http://www.archesproject.org) to see if other Arches users have shared their authority files. If so, you can simply download an authority file and replace the default files that come with Arches-HIP with the authority file that you prefer.
Create or Modify an Authority File
The following steps outline how to modify the authority documents before you load them into HIP. These steps can be followed using excel as your text editor but the final file must be saved as a UTF-8 formatted CSV file.
Note: You can find a summary of authority documents, their format, and steps for modifying them at Arches Documentation under the Reference Data Graph section
The steps for modifying authority documents BEFORE you load them into Arches-HIP is:
- Navigate to your authority files directory. Open the file you wish to modify.
- If you would like to edit an existing concept simply change the PrefLabel, AltLabels, ParentConceptid, ConceptType, Provider for that concept as necessary. Be sure to adhere to the rules for concept creation outlined in the Arches Documentation .
- If you would like to add a concept, create a unique
conceptidfor the concept (remember this id must be unique both internal to the authority file and between authority files) and then add your desired PrefLabel, AltLabels, ParentConceptid, ConceptType, Provider.- Make sure to review the guidelines of creating a concept in the ‘Loading Reference Data’ section of the Arches Documentation before modifying the HIP documents to ensure your edited documents will function with HIP.
When you’re happy with the contents of each authority file, navigate to /my_hip_app and run the following command to load your authroity files into Arches-HIP:
$ python manage.py packages -o load_concept_scheme -s 'path to authority files directory'
During load the authority files go through a set of validations. If there are errors in your authority documents load will fail and you will have to correct the errors before you try to load the authority files again.
Note
A detailed log of any errors detected in the authority files can be found here: /my_hip_app/logs/authority_file_errors.txt
Create Controlled Vocabularies Using the Reference Data Manager
If you wish, you can use the RDM to create each controlled vocabulary interactively. Before you start, You may wish to review a general overview of the RDM (http://http://arches3.readthedocs.org/en/latest/rdm/)
To use the RDM to create your controlled vocabularies, log in to Arches-HIP and click the RDM link. Click on the the “Arches” button on the right side of the screen. This will show you a listing of all the attributes in the six resource graphs that require a controlled vocabulary.
Click on the button labeled “Activity Type”. Your screen should look something like this:
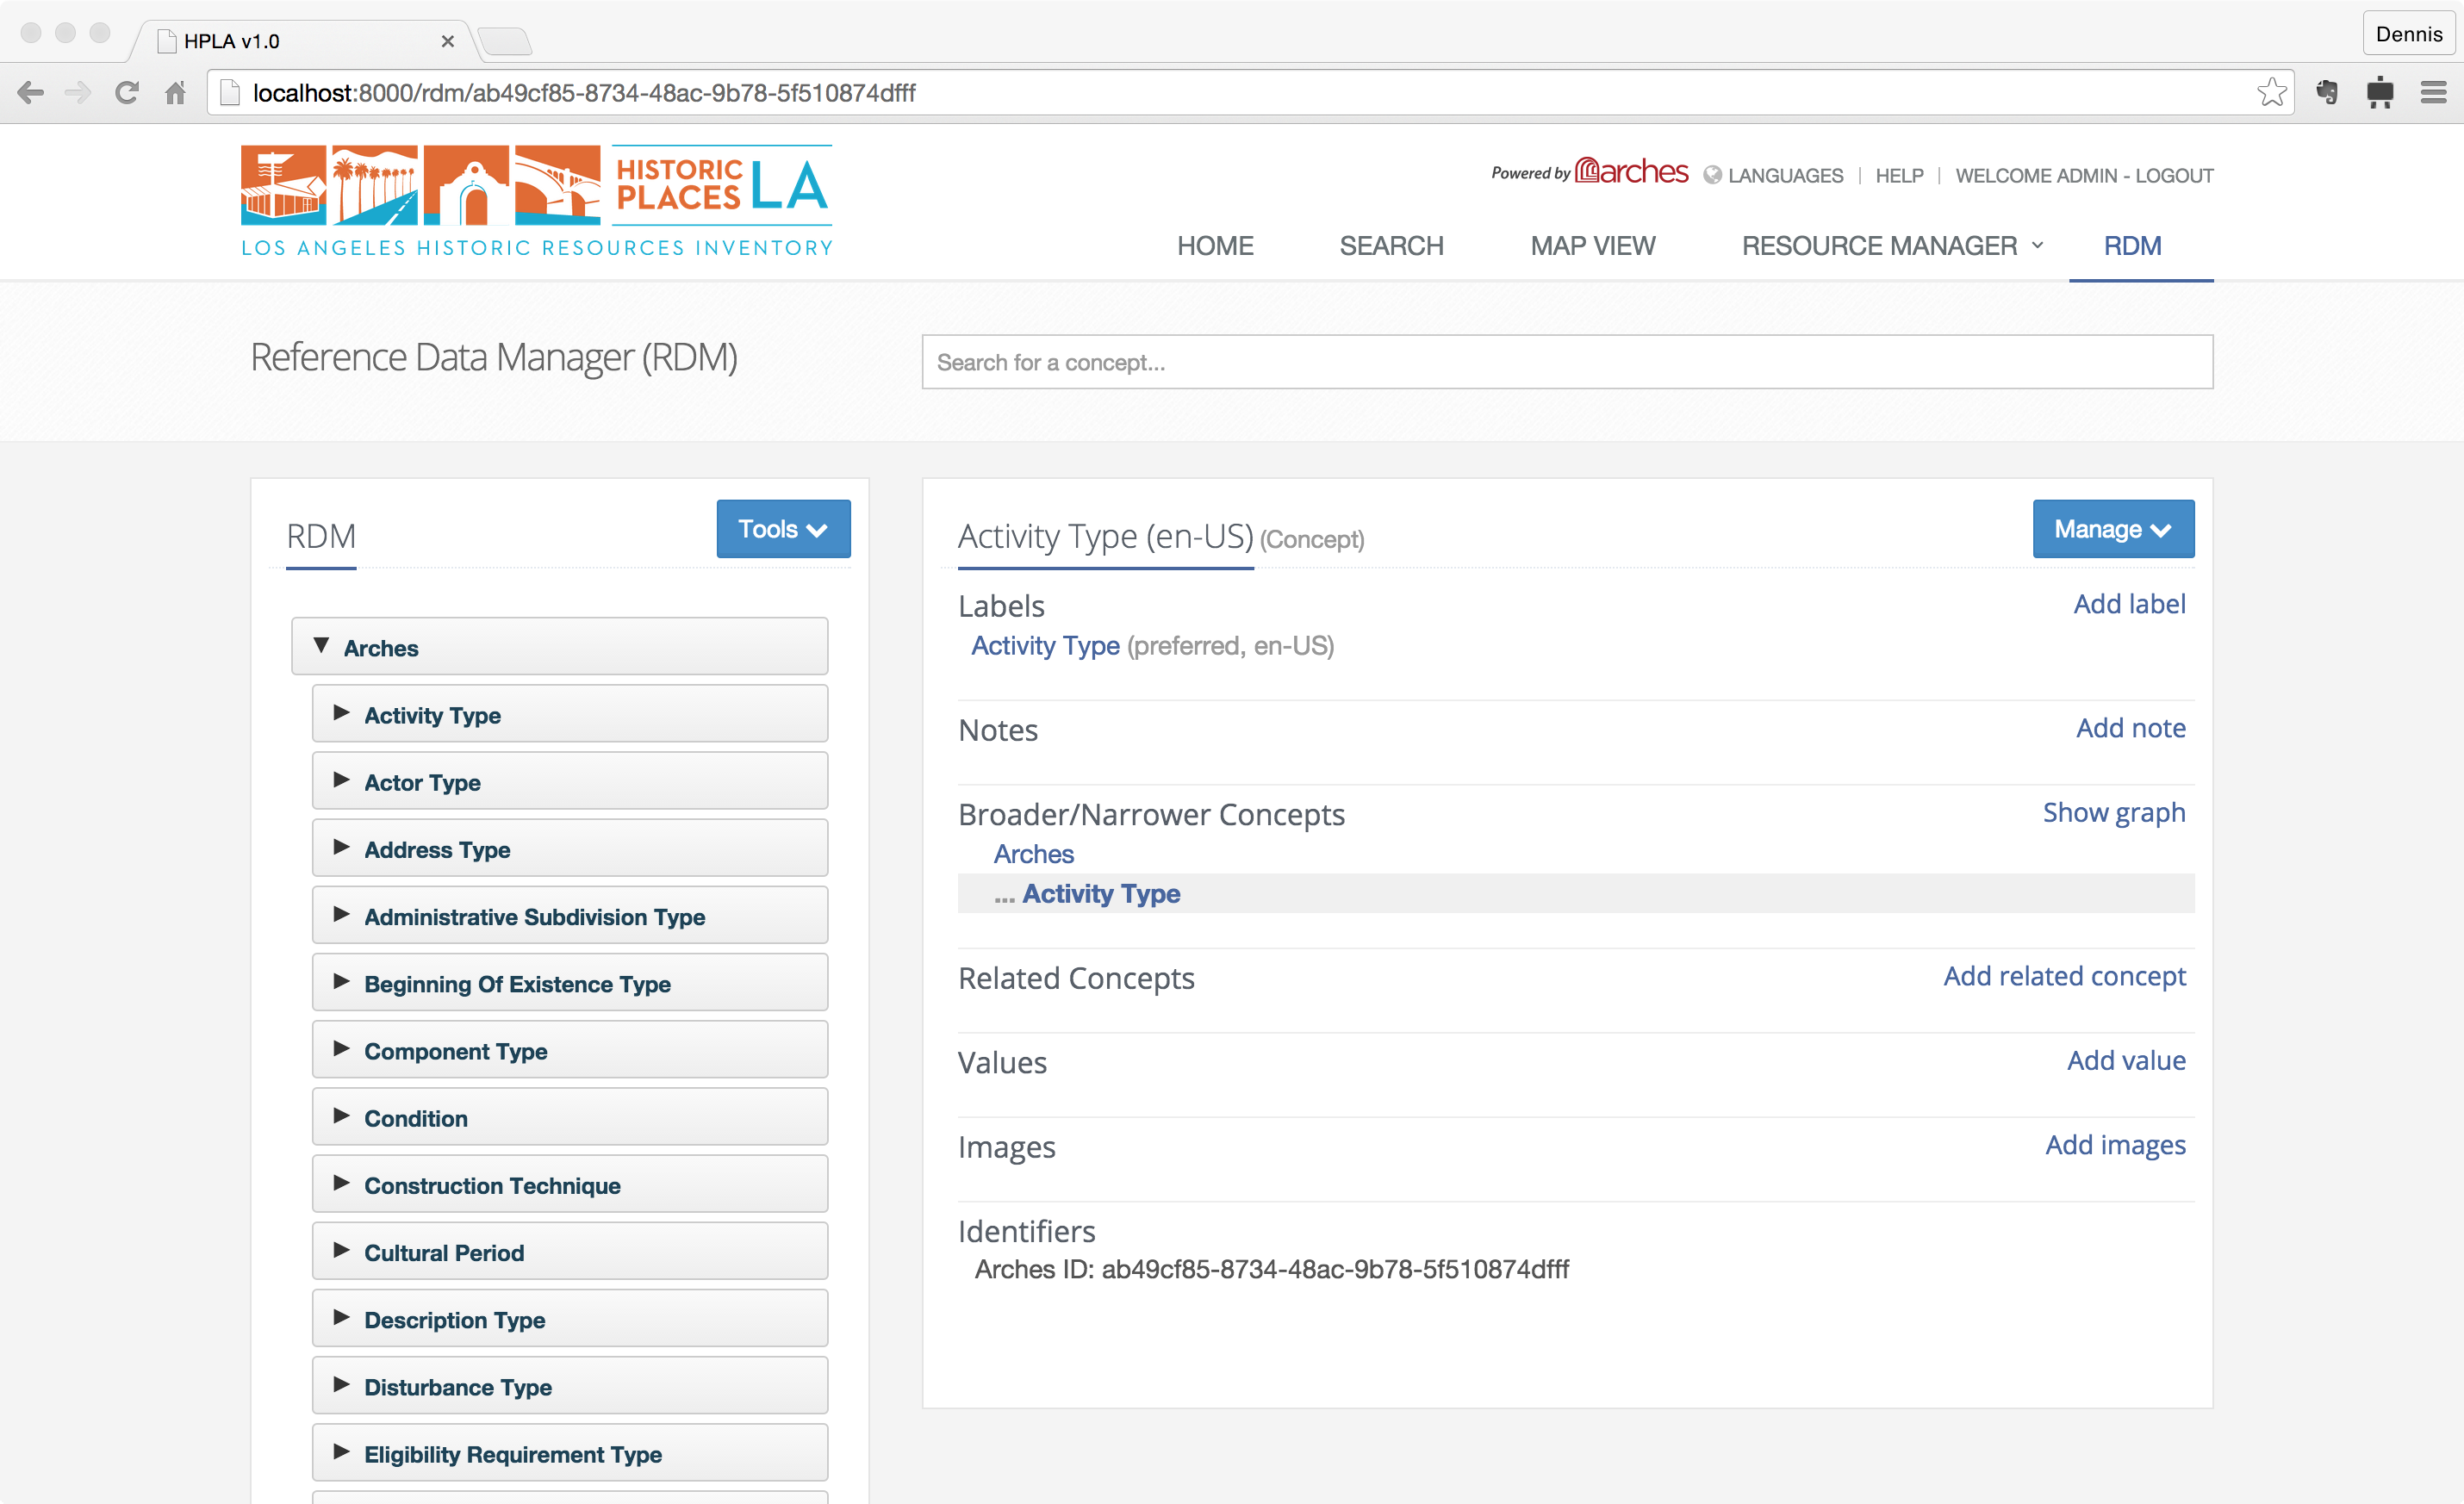
What you’re seeing is the data entry screen for the terms that you will create for the Activity Type controlled vocabulary.
What is an Activity TYpe? Refer to Appendix A and find the entry for Activity Type. It says that Activity Type is the list of activities that you will associate with the Activity Resource. Examples might include: Investigations, Excavations, Heritage Surveys, Literature Review, or Designation for Protection. Really, the list of activity types is up to you. You may add as many activities as you need to describe your organization’s efforts.
Click on the “Manage” button in the upper right of the form and select “Add Child” from the list of actions. You see a form appear that asks you to enter a label and note for a term that you want to add to your controlled vocabulary. Technically, you are entering a concept into the RDM and providing a preferred label and scope note (in the language that you specify) into the RDM, with is Arches’ thesaurus management system.
Here’s how you could create an entry for an “Investigation” activity:
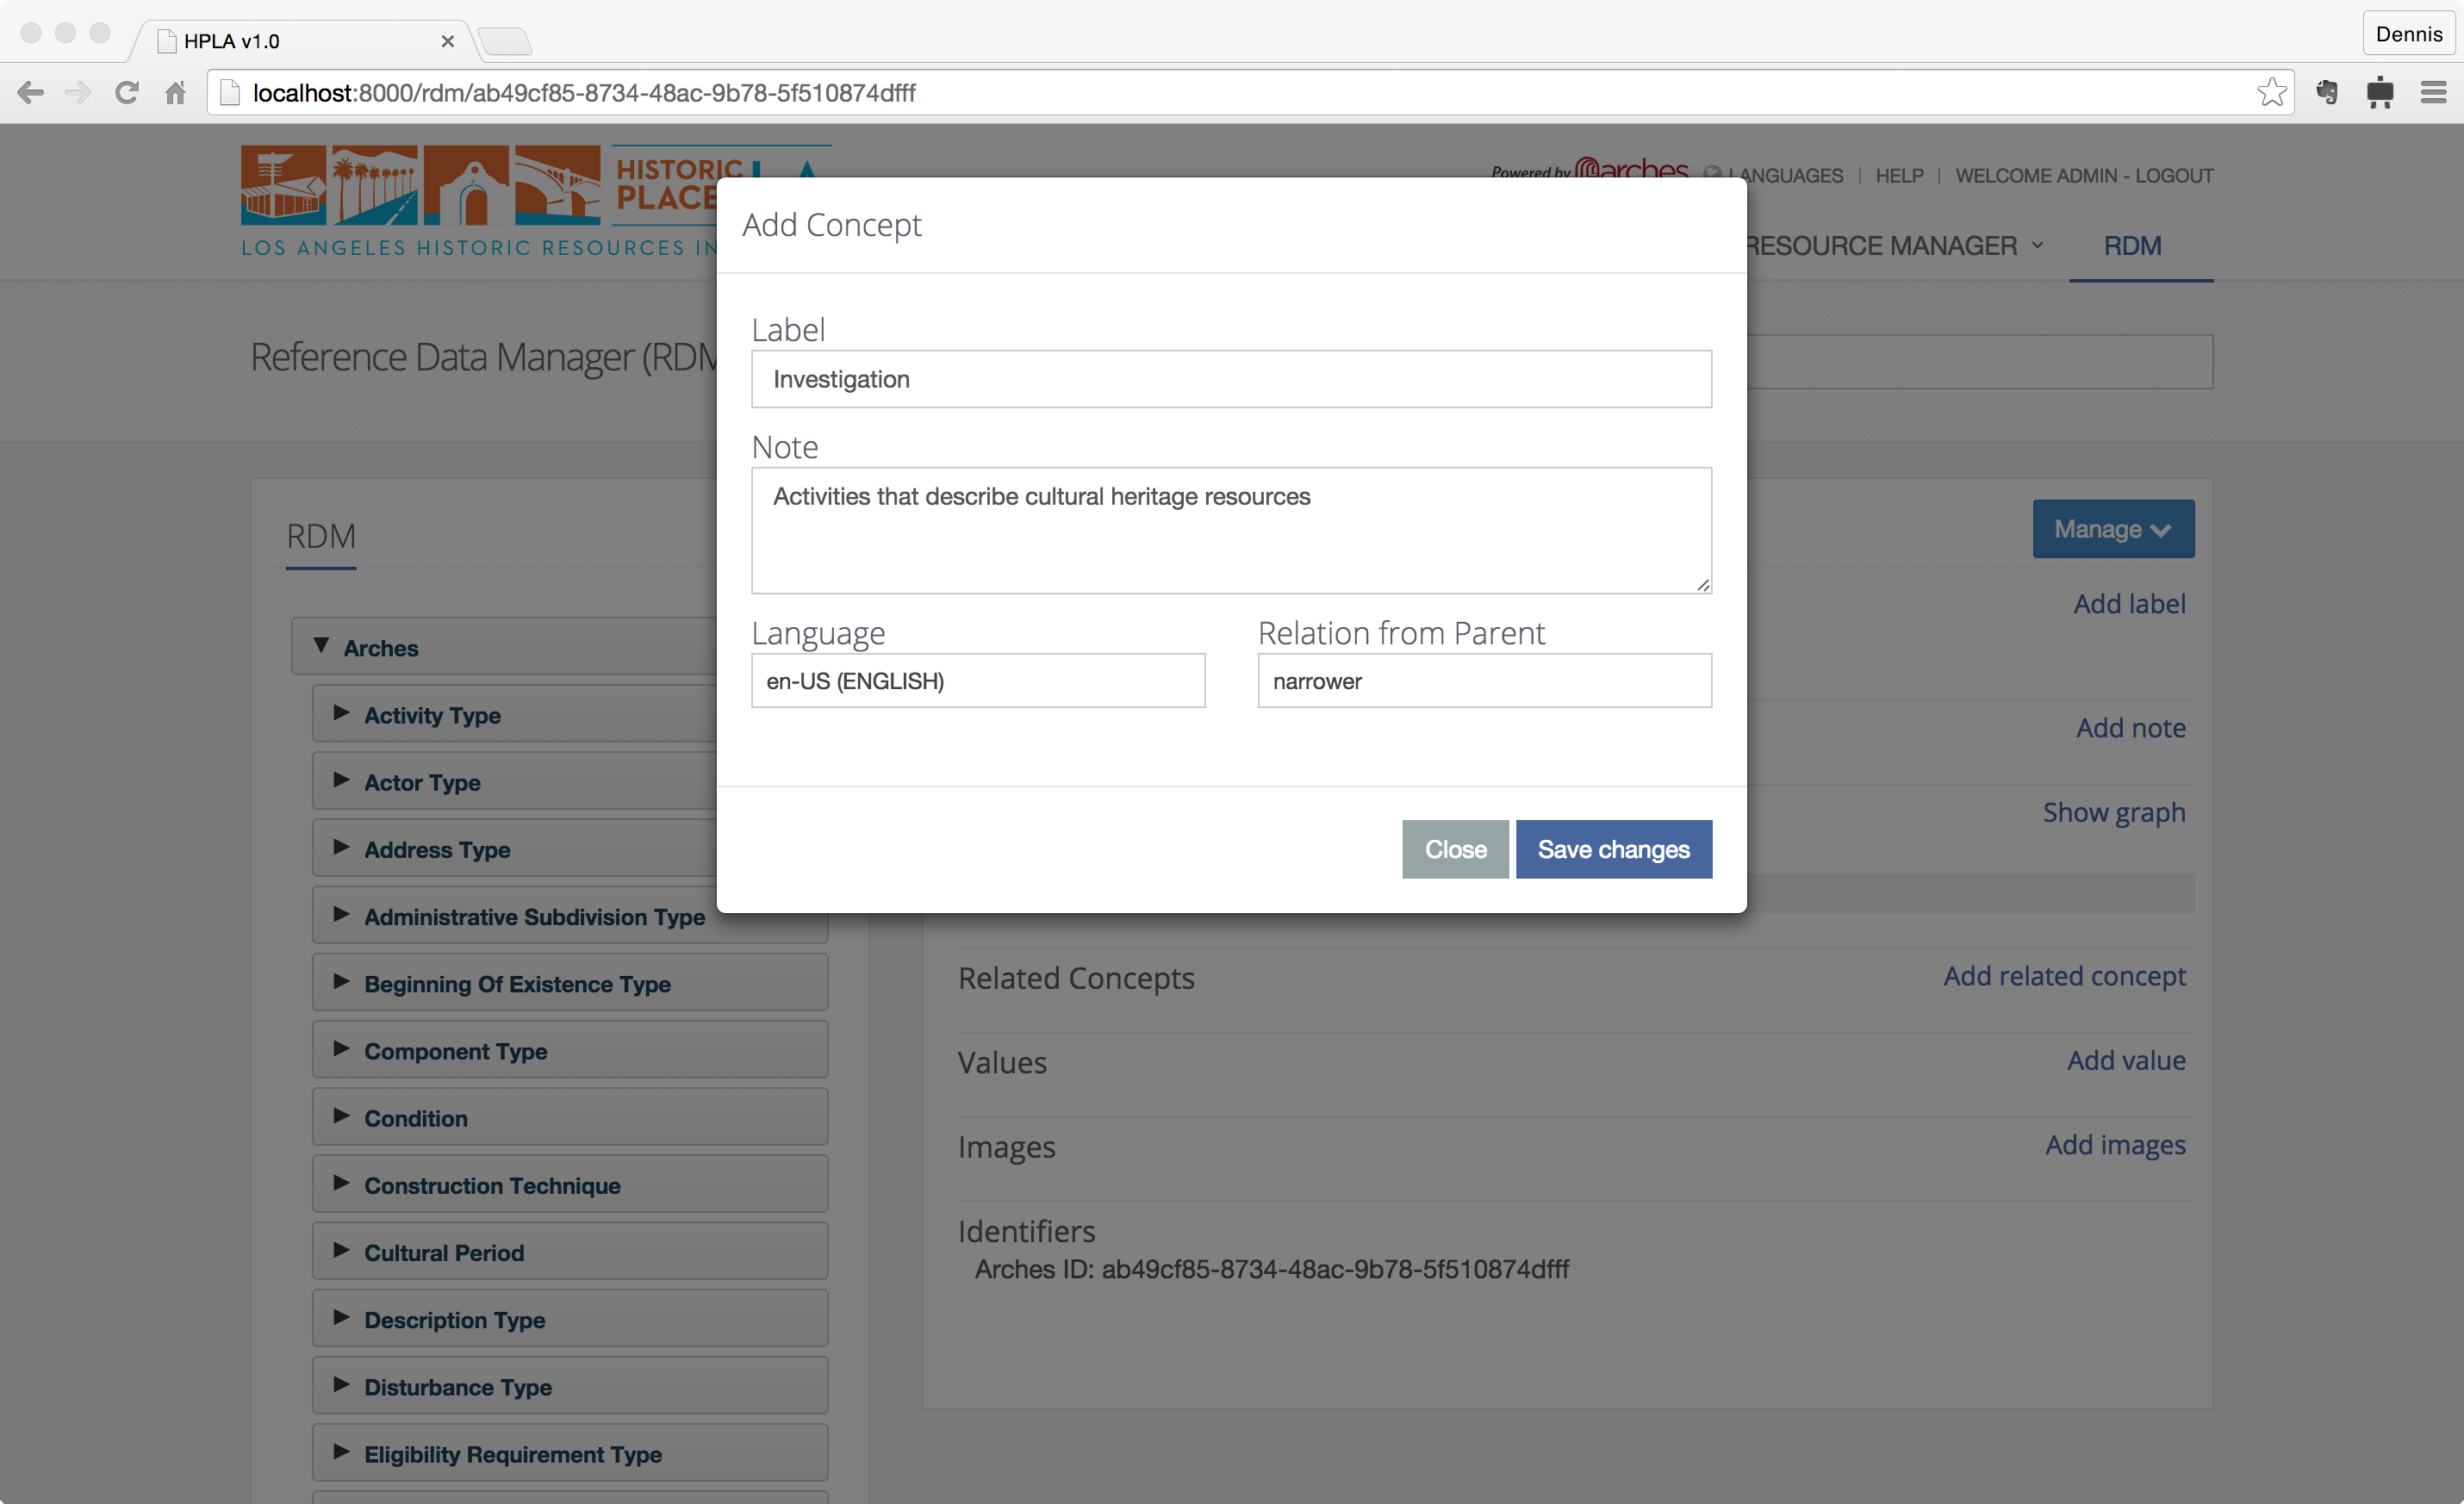
Click “Save Changes” when you’re done and you’ll see your entry listed under the “Activity Type” concept. You can add as many activities as you like, and you may organize them hierarchically if you want. Simply click on an existing entry in the list and then add a child (like you did for your first entry) to add one level of nesting to your hierarchy. In this way, you could group several terms under “Investigation” to keep them nicely organized and conceptually distinct from a list of Restoration activities.
Here’s what a set of activities grouped under the Investigation activity might look like:
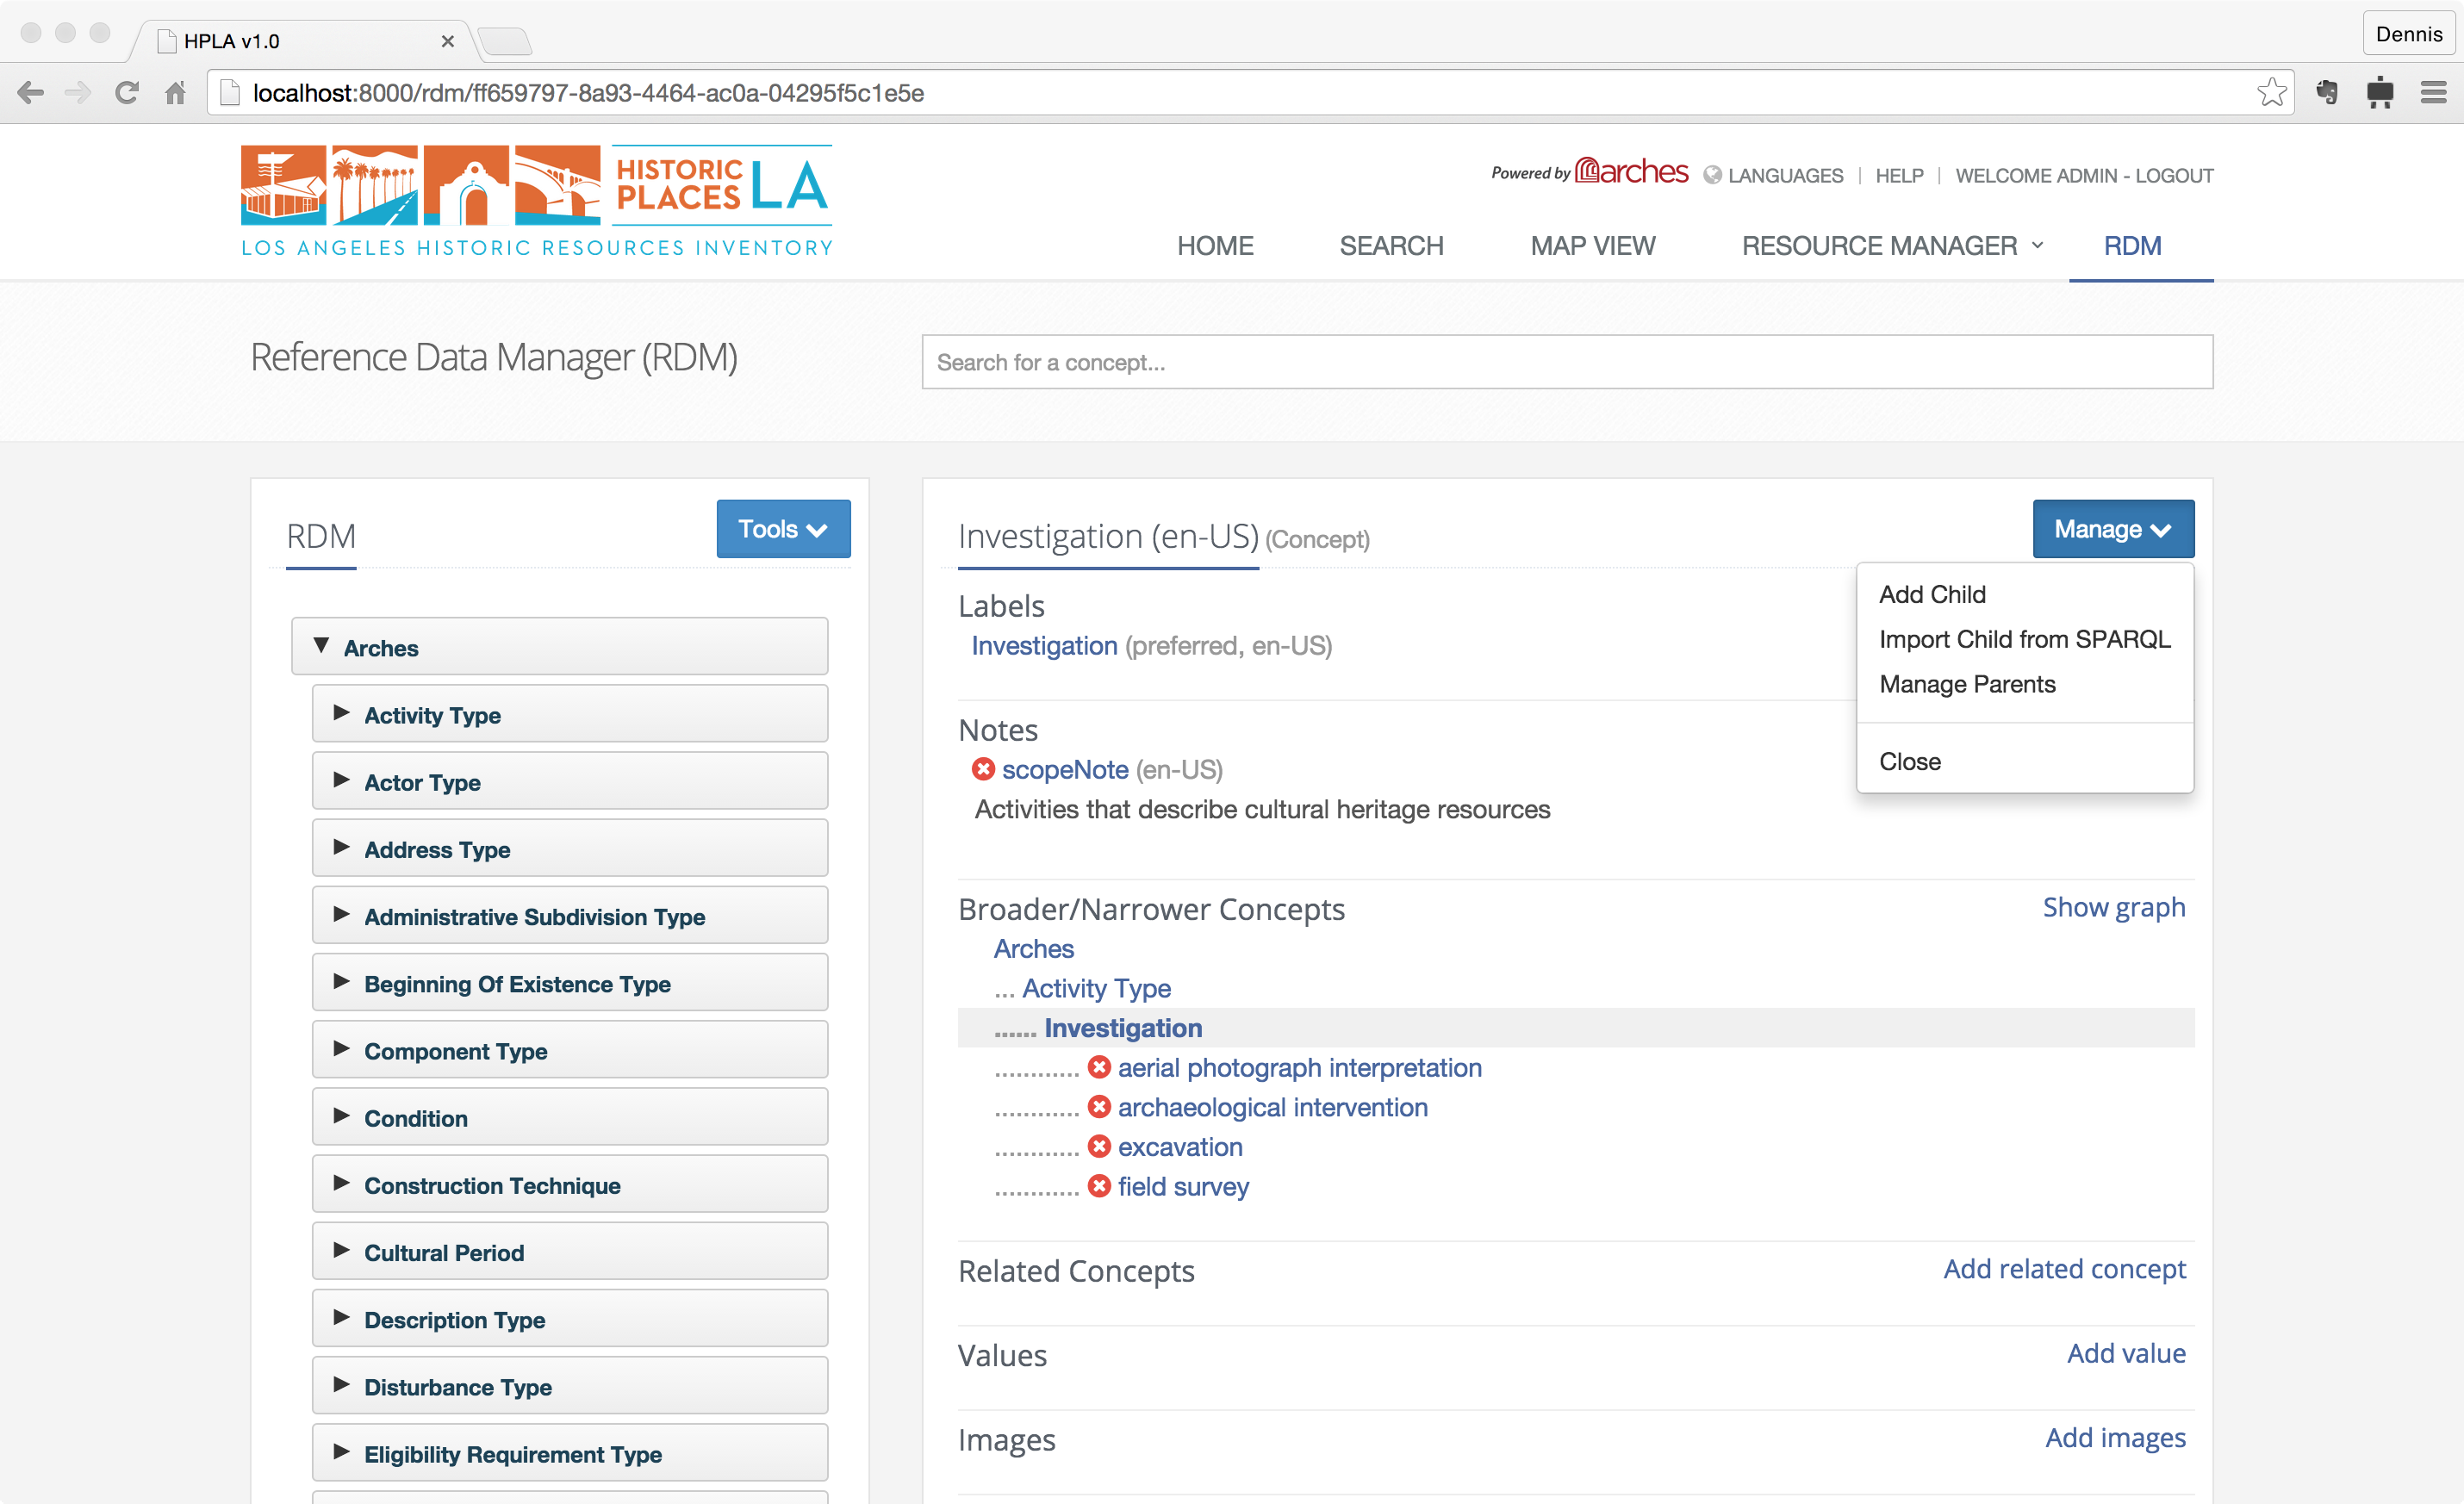
You’re free to build simple list of activities, or a deeply nested hierarchy. Its up to you to decide how you want to organize your vocabulary. If you haven’t already, it’s worth reading the Arches RDM documentation to get a more complete description of how the RDM works.
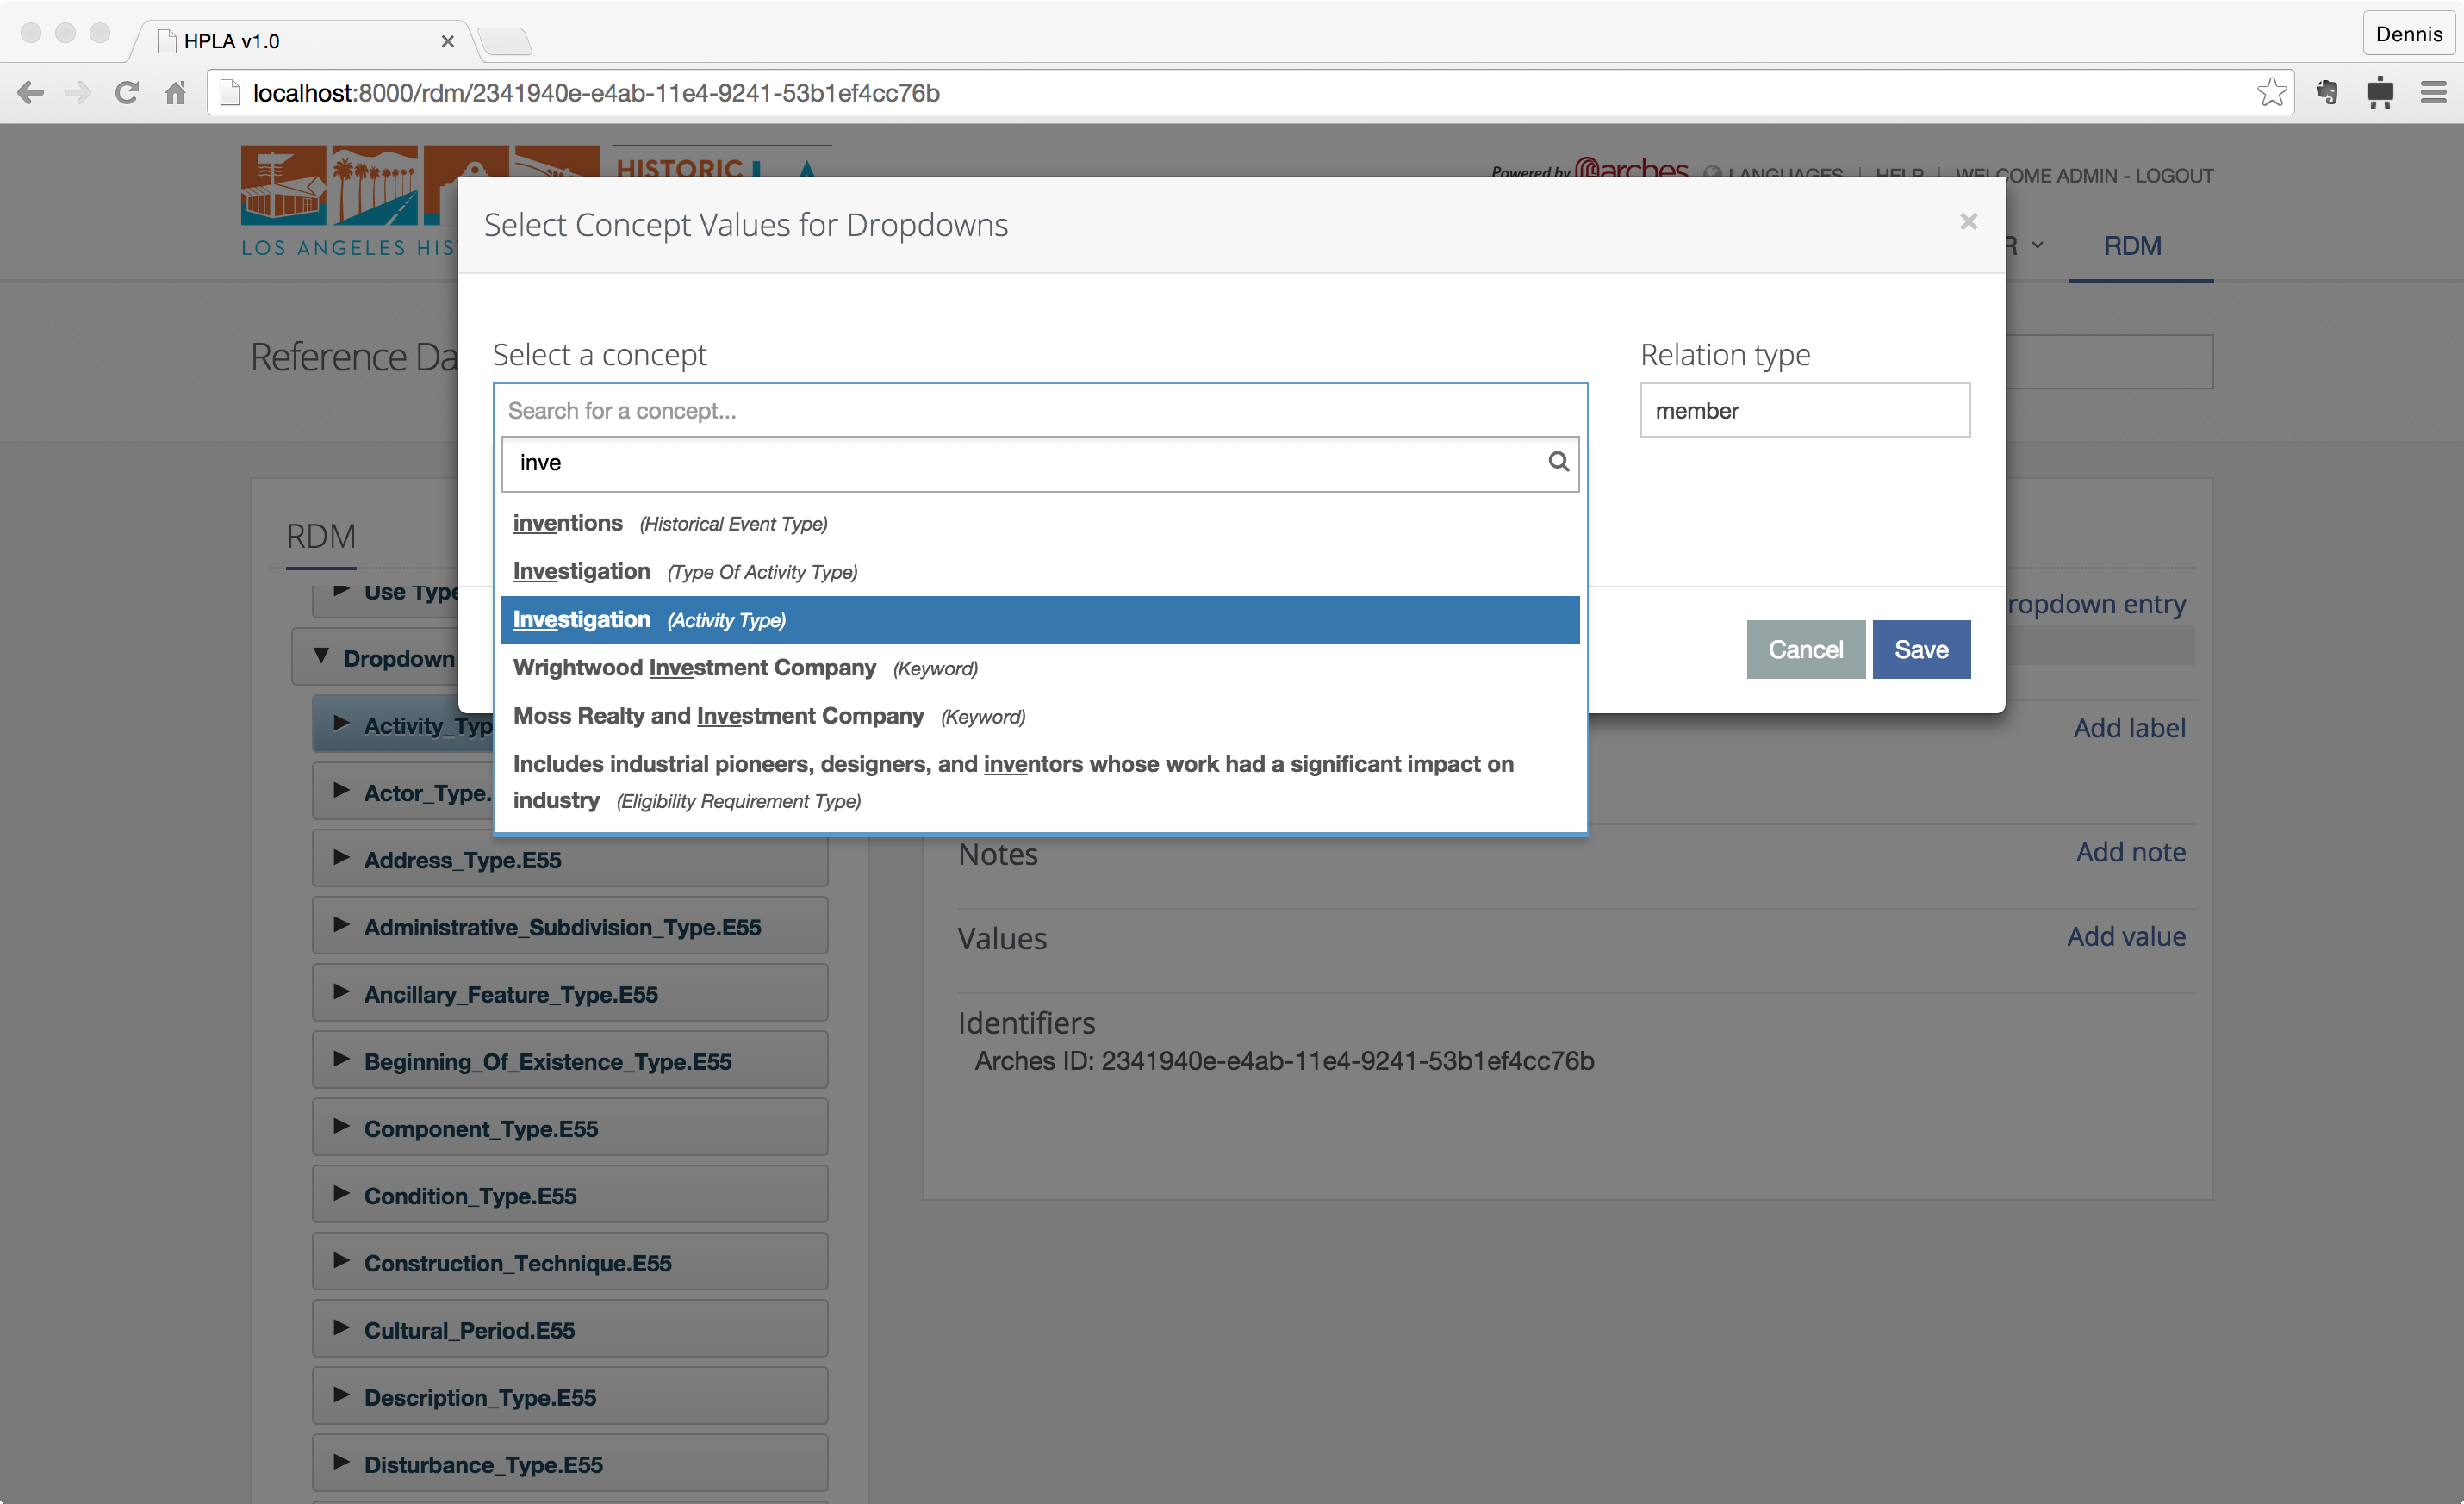
When you’re satisfied with your list, click on the button labeled “Dropdowns” (you may need to scroll down the list of vocabularies or click on the “Arches” button again before you see it). Click on the “Activity_Type.E55” button
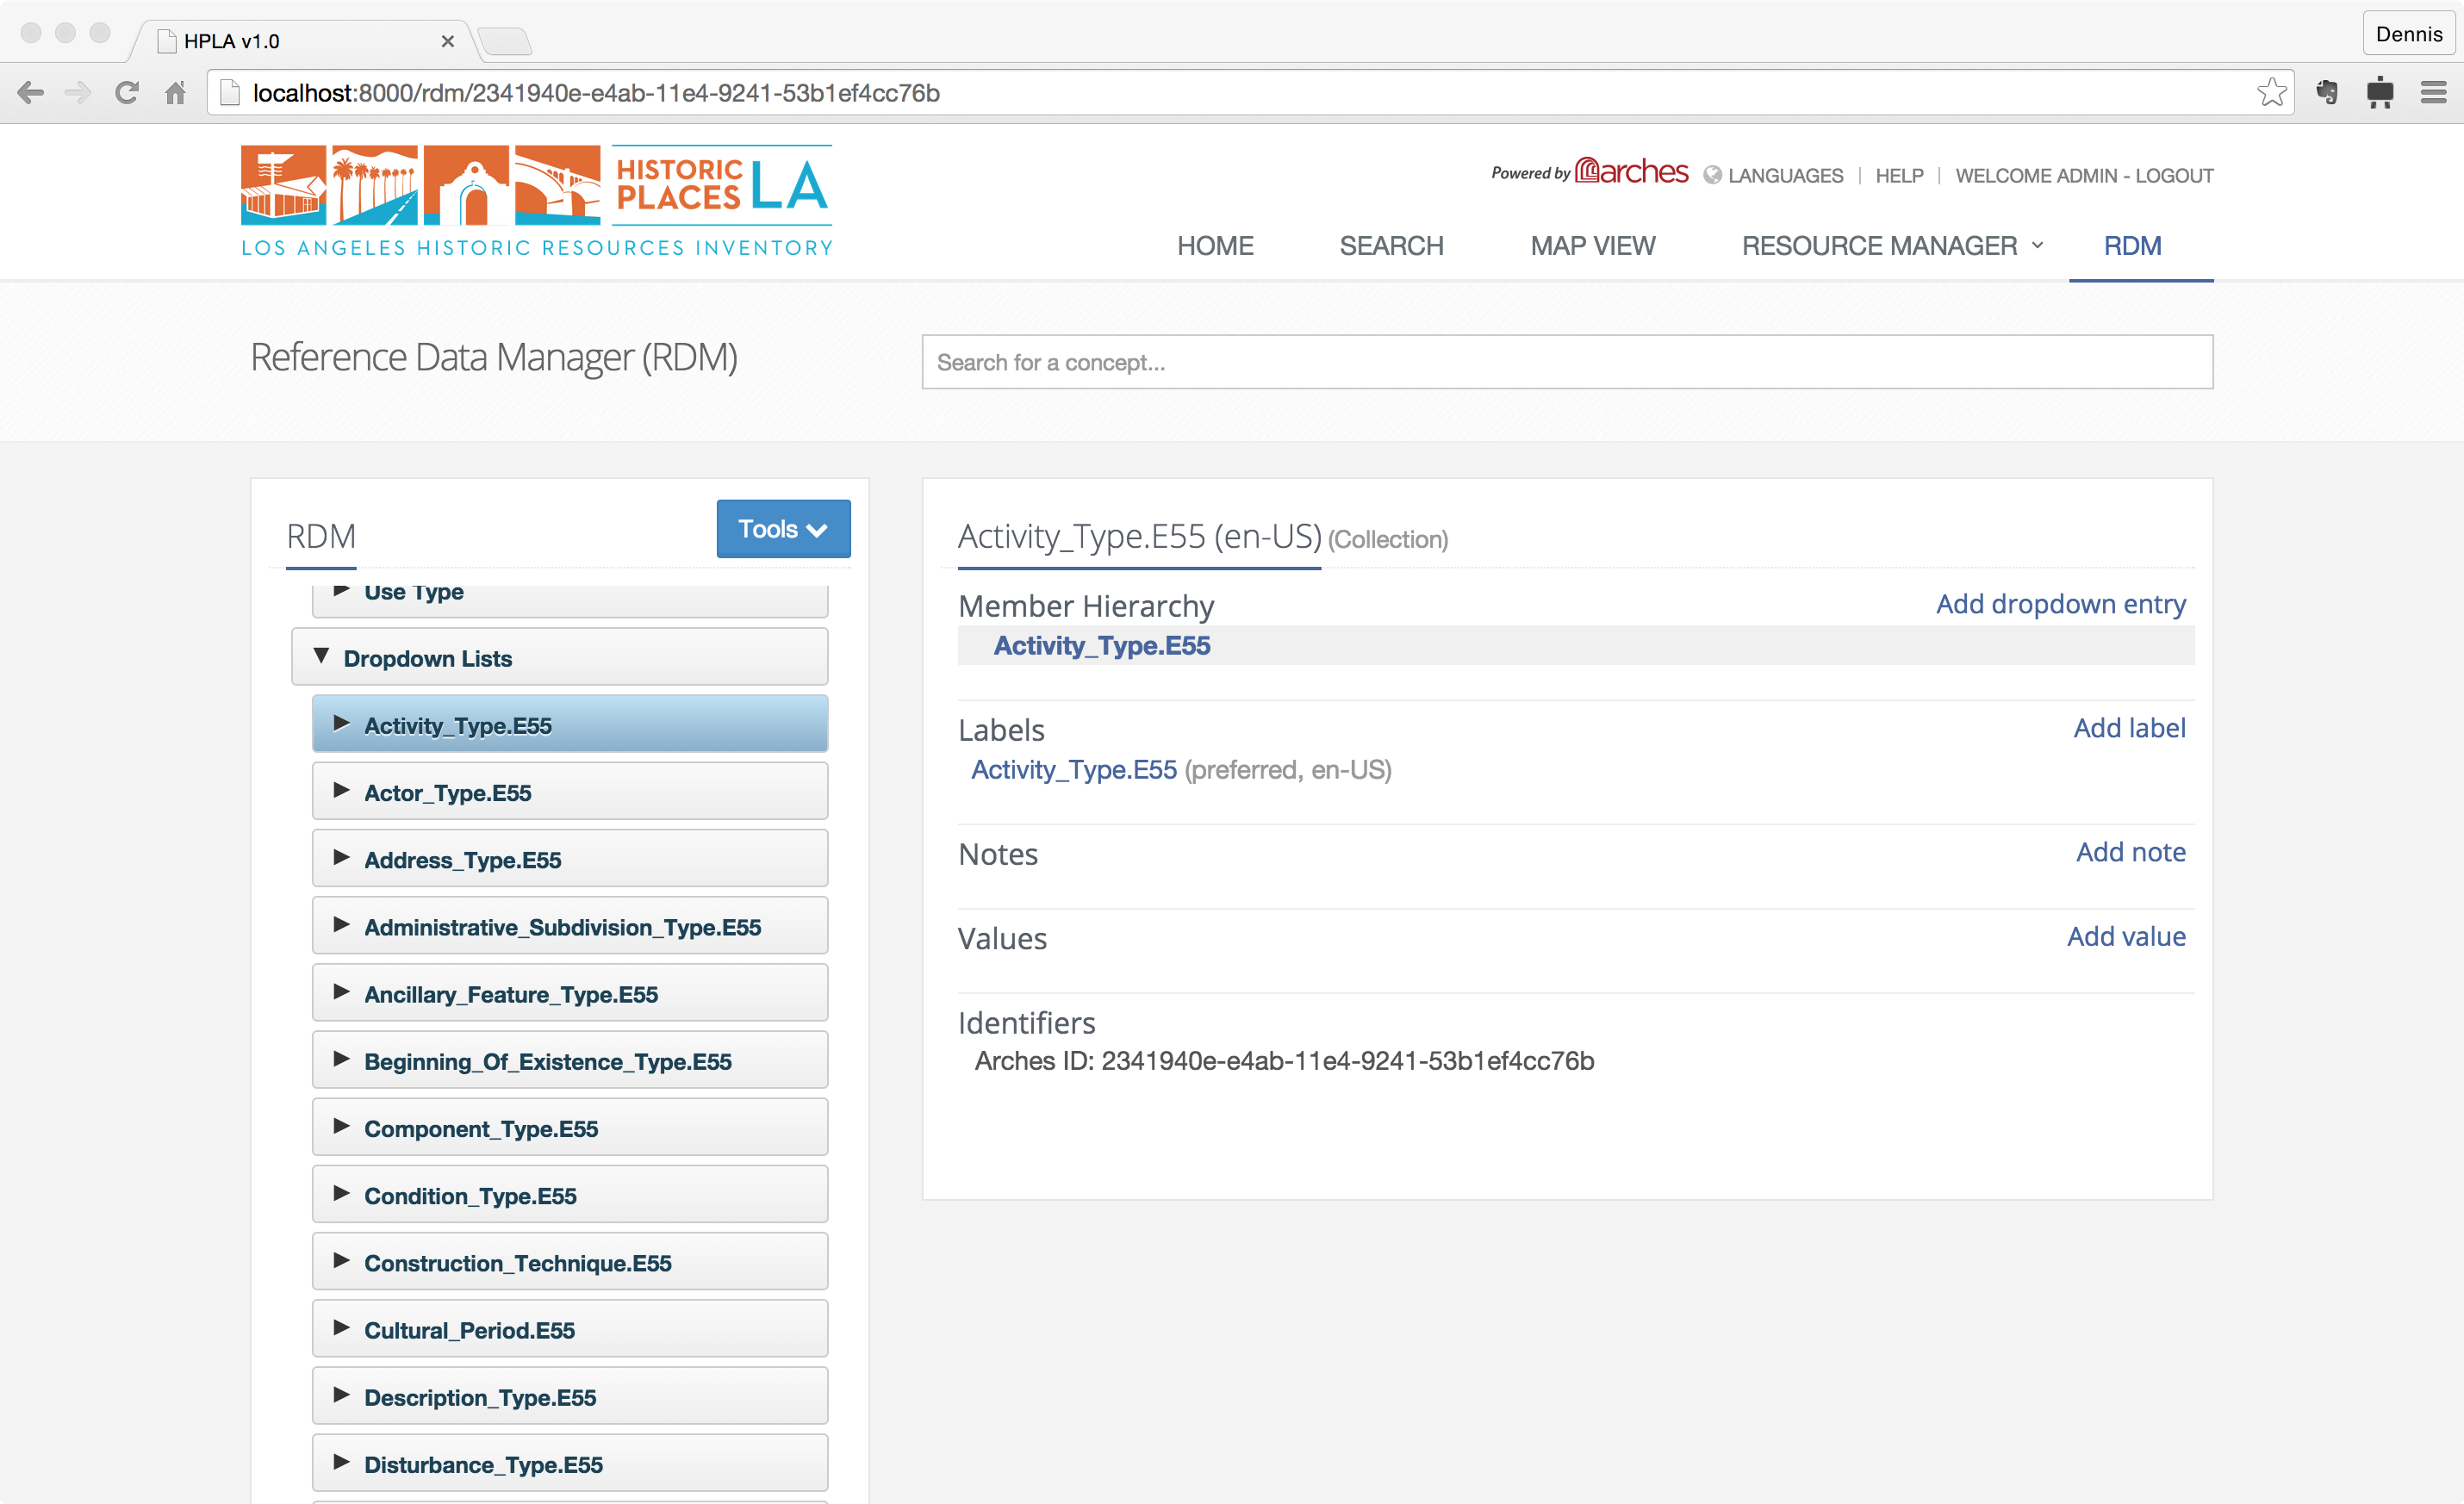
This form allows you configure which of the terms in your controlled vocabulary will be shown in the dropdown element on the appropriate data entry form for this attribute. Arches introduces this form so that you can decide stop using terms in the future (or add new terms) without compromising your data.
Click the “Add dropdown entry” and type in a term from your activity type controlled vocabulary. For example: “investigation”. This will link your term in the controlled vocabulary with the form’s dropdown. Note that Arches will automatically add any children that may exist under the term you selected. Go ahead and add all the term you want your data entry staff to see when they create an Activity.
Notice that Arches includes many controlled vocabularies (see the list of vocabularies listed under the Arches button). You’ll need to follow the same steps we just went through for each vocabulary in this list. If you don’t, you won’t be able to enter data into an Arches-HIP resource that requires a controlled vocabulary.
Importing Cultural Heritage Data into Arches-HIP
This section outlines how to import cultural heritage data into Arches-HIP. Arches-HIP allows you to import data from a .arches file or from a GIS (Geographic Information System) using a .shp file.
If you would like to use Arches-HIP’s data entry forms to create your cultural heritage data, feel free to skip this section entirely. If you would like to load Arches-HIP sample data and not create your own cultural heritage data skip to ‘Loading cultural heritage Data.’
If you would like to create and load your own Arches-HIP cultural heritage data this whole section is for you!
Importing / Creating Cultural Heritage Data Using the .ARCHES File
If you have existing cultural heritage data that you want to import into Arches, you’ll need to prepare either an ”.arches” text file or a GIS shapefile. Either file type will allow you automatically import thousands of cultural heritage data records into Arches-HIP.
Unsure of which format to use? The .arches file defines a simple format and allows you to import very sophisticated datasets (e.g.: heritage data with complex attributes such as multiple geometry types, names, typology). Use a shapefile to import your existing data if you use GIS to create data or if your cultural heritage data is “flat” (e.g.: one value per attribute, such as a single name for each heritage resource).
Creating a ``.arches`` file
For general directions on how to create a .arches file you’ll want to refer to the ‘Loading Business Data’ section of the Arches Documentation. This section will review rules specific to creating a .arches file based on HIP graphs.
In this example we’ll begin by creating a text file called
example.archesand adding the following text to the first line:RESOURCEID|RESOURCETYPE|ATTRIBUTENAME|ATTRIBUTEVALUE|GROUPID
On the second line enter your unique resourceid (e.g.: a unique identifier for the resource record) followed by a
|:RESOURCEID|RESOURCETYPE|ATTRIBUTENAME|ATTRIBUTEVALUE|GROUPID unique_resource_id|
Now add a valid Arches-HIP resource type followed by a
|:RESOURCEID|RESOURCETYPE|ATTRIBUTENAME|ATTRIBUTEVALUE|GROUPID unique_resource_id|ACTIVITY.E7|
Note
Valid Arches-HIP resource types include:
- Activity.E7
- Actor.E39
- Heritage Resource.E18
- Heritage Resource Group.E27
- Historical Event.E5
- Information Resource.E73
Next, declare the attribute that you want to load into HIP. You’ll need to declare a valid Arches-HIP ATTRIBUTENAME. Remember,
ATTRIBUTENAMErelates directly to an entity type from a resource graph. In fact the only valid values forATTRIBUTENAMEin the.archesfile are entity types from the resource graph nodes file indicated in theRESOURCETYPEcolumn. More specifically, only valid entity types are allowed to store data and business values. Furthermore, the validation process stringently restricts all files from storing data in any entity types that disallow that.Look here for a list of entity types for each Arches-HIP resource.
Add the entity type name from the graph to the
ATTRIBUTENAMEcolumn in your CSV followed by a|:RESOURCEID|RESOURCETYPE|ATTRIBUTENAME|ATTRIBUTEVALUE|GROUPID unique_resource_id|ACTIVITY.E7|START_DATE_OF_EXISTENCE.E49|
Next in the
ATTRIBUTEVALUE‘column’ input your specific information for that attribute ensuring that it is in the correct format for that data type (i.e. is formatted correctly for the attributes business table). For example, if you want to load a date field, make sure that you enter an value that is formatted as a date. Make sure your value is followed by a|:RESOURCEID|RESOURCETYPE|ATTRIBUTENAME|ATTRIBUTEVALUE|GROUPID unique_resource_id|ACTIVITY.E7|START_DATE_OF_EXISTENCE.E49|1945-01-12|
Note: Arches-HIP recognizes the following formats:
String: Words

Numbers: 32 or 3.1417

Dates: YYYY-MM-DD  like 2015-04-09 (which represents April 9, 2015)

Geometries: Well Known Text encoding of a geospatial geometry (see http://en.wikipedia.org/wiki/Well-known_text).  Geometry coordinates must be longitude/latitude WGS84 (e.g.: the 4326 spatial reference system identifier)

Files: A path to a file that you want to upload to Arches-HIP.  See Arches documentation for more details.

Controlled Vocabulary Terms: The unique identifier of the term you want to use.  If you loaded your controlled vocabularies with authority files, this is the unique identifier associated with the term you want to reference.  If you entered the term using the RDM, this is the Universally Unique Identifier (UUID) that Arches assigned to your term.
Finally, if the data item is to be grouped with another piece of data make sure to add a
GROUPID. For example, if you want to add a start date and the type of start date (e.g.: July 10, 1934 is a BUILT DATE). If the data item is not intended to be grouped simply enter a generic value forGROUPID:RESOURCEID|RESOURCETYPE|ATTRIBUTENAME|ATTRIBUTEVALUE|GROUPID unique_resource_id|ACTIVITY.E7|START_DATE_OF_EXISTENCE.E49|1945-01-12|BEGINNING_OF_EXISTENCE.E63-0 unique_resource_id|ACTIVITY.E7|BEGINNING_OF_EXISTENCE_TYPE.E55|BEGIN_EXIST:1|BEGINNING_OF_EXISTENCE.E63-0
Here the
START_DATE_OF_EXISTENCE.E49attribute is grouped together with aBEGINNING_OF_EXISTENCE_TYPE.E55attribute.Note
A few things to remember:
- All attributes of a resource must be on adjacent lines in your .arches file.
- Some attributes must be paired with another attribute to have meaning. For instance, a BEGINNING_OF_EXISTENCE_TYPE.E55 attribute would have no meaing if not paired with a START_DATE_OF_EXISTENCE.E49 attribute.
Note
Here is a list of attributes that must be paired in Arches-HIP:
BEGINNING_OF_EXISTENCE_TYPE.E55,START_DATE_OF_EXISTENCE.E49END_OF_EXISTENCE_TYPE.E55,END_DATE_OF_EXISTENCE.E49NAME.E41,NAME_TYPE.E55DESCRIPTION.E62,DESCRIPTION_TYPE.E55RIGHT.E30,RIGHT_TYPE.E55TITLE.E41,TITLE_TYPE.E55ACTOR_APPELLATION.E82,NAME_TYPE.E55
You’ll need to add a line for each attribute that you want to load for a given resource record. This means that an .Arches file can get very large. Obviously, you won’t want to write out every line by hand. But now that you understand the format, you can use Excel, a database, or open source tools (such as Open Refine, http://openrefine.org/) to automate the creation of a .Arches file.
In some instances you may want to relate resources together (e.g. you may want to relate many resources to one resource district or an actor to a particular heritage resource). To do this you will want to create a .relations file to accompany your .arches file. The .relations file should have the same name as your .arches file and be stored in the same directory location. The .relations file contains six columns resourceid_from, resourceid_to, start_date, end_date, relation_type, notes. For more instructions on how to create a .relations file see the Arches Documentation.
Note
In order to create a relationship between two resources both resourceids referenced in the .relations file must be present in your .arches file.
Importing Creating Cultural Heritage Data Using a Shape File
Arches makes it easy to import cultural heritage data from a GIS shapefile. You’ll need to create a simple configuration file that tells Arches-HIP how to associate the information in your shapefile with a resource.
Note
A few things to keep in mind before we begin
- Your shapefile can contain only one resource type per shapefile. For example, you would need one shapefile to load Heritage Resources and a second shapefile for Activities.
- Your shapefile projection must be defined as WGS84 Lat/Lon (EPSG:4326).
Create a configuration file
You’ll need to create configuration file to tell Arches how the fields in your shapefile correspond to nodes in a resource graph. The configuration file should have the same base name as your shapefile with the extension
.config. For example, if your shapefile is calledheritage_resources.shp, you will will need aheritage_resources.configfile along with yourheritage_resources.dbf, etc.The
.configfile is formatted in JSON as you can see in this example:{ “RESOURCE_TYPE”: “HERITAGE_RESOURCE.E18″, “GEOM_TYPE”: “SPATIAL_COORDINATES_GEOMETRY.E47″, “FIELD_MAP”: [ [“status”,”STATUS.E55″], [“start”,”START_DATE_OF_EXISTENCE.E49″], [“name”,”NAME.E41″], [“place_addr”,”PLACE_ADDRESS.E45″], [“descrip”,”DESCRIPTION.E62″], [“heri_type”,”HERITAGE_RESOURCE_TYPE.E55″] ] }The JSON should contain the following properties:
RESOURCE_TYPE: the resource type of your shapefile.GEOM_TYPE: the name of the entity type that Arches HIP uses to manage geometry.FIELD_MAP: a list of shapefile fields and their corresponding entity types. Each field must be enclosed in brackets, with the shapefile column name in the first position and theentitytypeidin the second.
Note
The curly braces at the beginning and end of the file are important!
Confirm Your Shapefile Data
There are just a couple of details to keep in mind when creating your shapefile.
Remember that the projection of your data must be EPSG:4326 (WGS84 Lat/Lon).
The data type of your shapefile columns need to match the datatype of the nodes (entitytypes) to which they are mapped. For example, if you want to load a “name” column in your shapefile to “NAME.E41” (which the HIP defines as a “string” data type), you must ensure that your shapefile treats “name” as a string.
If you want to load a field in your shapefile to an Arches controlled vocabulary, you’ll need to make sure that the values in the shapefile match a preferred label in Arches’ Reference Data Manager (RDM). For example, if you want to load values from your shapefile into the
HERITAGE_RESOURCE_TYPE.E55node, the values in your shapefile column must match a preferred label in the RDM scheme (by default Arches uses theHERITAGE_RESOURCE_TYPE_AUTHORITY_DOCUMENT.csvscheme)
Load a .ARCHES or Shapefile into Arches-HIP
To load cultural heritage data, navigate to /my_hip_app and run the following command:
$ python manage.py packages -o load_resources -s ‘path to file’
Note
This command works for both .arches and .shp files.
Arches-HIP Data Validation
In addition to the validation that is performed on every .arches file from Arches, there is some specific HIP validation that a .arches file must pass as well. These validations are listed below:
Check Duplicates in Group
Some entity type groups should only ever contain zero or one of a certain entity type. For instance, every
NAME.E41should be associated to one and only oneNAME_TYPE.E55. You may have multiple names per resource or the same name repeated multiple times but each instance ofNAME.E41should be associated with one and only oneNAME_TYPE.E55. Here’s a list of entity types that must appear only zero or one times in a given group.
ACTOR_APPELLATION.E82ADDRESS_TYPE.E55COMPONENT_TYPE.E55CULTURAL_PERIOD.E55DESCRIPTION.E62DESCRIPTION_TYPE.E55EVALUATION_CRITERIA_TYPE.E55FILE_PATH.E62FROM_DATE.E49HERITAGE_RESOURCE_TYPE.E55HERITAGE_RESOURCE_USE_TYPE.E55NAME.E41NAME_TYPE.E55PLACE_ADDRESS.E45RIGHT.E30RIGHT_TYPE.E55THUMBNAIL.E62TITLE.E41TITLE_TYPE.E55TO_DATE.E49Remember there can be multiple instances of these entity types per resource just not per group within resource.
Check Paired Attributes**
Some attributes should always be paired with another attribute. For example, for each NAME_TYPE.E55 in your .arches file there should be a corresponding NAME.E41, otherwise the NAME_TYPE.E55 does not describe anything. Arches-HIP checks to see that the following attriubtes are paired in your .arches file.
BEGINNING_OF_EXISTENCE_TYPE.E55,START_DATE_OF_EXISTENCE.E49END_OF_EXISTENCE_TYPE.E55,END_DATE_OF_EXISTENCE.E49NAME.E41,NAME_TYPE.E55DESCRIPTION.E62,DESCRIPTION_TYPE.E55RIGHT.E30,RIGHT_TYPE.E55TITLE.E41,TITLE_TYPE.E55ACTOR_APPELLATION.E82,NAME_TYPE.E55
Note
Any validation errors that occur during a data load can be viewed in the following file: my_hip_app/my_hip_app/logs/validation_errors.txt
Unloading Cultural Heritage Data
If you managed to load data that you did not intend to load, or if for some reason you changed your mind about loading your data, don’t worry. You can easily unload a batch of data from Arches.
To do this you will need the Load ID that was created when you loaded your data. Arches writes the Load ID to the terminal you used to start the import, and the Load ID is also located in the notes column of your data.edit_log table.
The Load ID will look something like this: “LOADID:2014-12-2-7-17-23884” (e.g.: the timestamp by year-month-day-hour-minute-microsecond) of the start of your resource load, so that may help you find the correct Load ID if you are unsure.
Once you have the correct Load ID, you can delete all of the resources created during a load with the following command:
$ python manage.py packages -o remove_resources –load_id YOUR_LOADID
In order to use HIP three types of data must be loaded to the database: resource graphs, authority documents and cultural heritage data. Below we outline what data comes included with HIP, simple instructions on how this data can be modified and how to create your own cultural heritage data.
Optional GIS Layers for Administrative Areas
Arches-HIP allows you to load GIS data as well as cultural heritage data. This will allow Arches-HIP to compare the spatial coordinates of a cultural heritage resource with GIS data describing administrative areas and cadastres to automatically determine where your heritage resources overlap administrative and ownership polygons.
The parcels and overlays tables within the “aux” schema of Arches-HIP’s Postgres database supports using GIS layers to automate the entry of spatially derivable attributes. In HIP, Arches automates the entry of ADMINISTRATIVE_SUBDIVISION and ADMINISTRATIVE_SUBDIVISION_TYPE (for both Heritage Resource and Heritage Group) by comparing the geometry of the resource against the geometry of features in the aux.overlays table. Those overlay features that the heritage resource spatially interacts with are assumed to define the correct administrative area(s) and are associated with the resource.
This “automated” data entry is a nice-to-have feature. That is, if you do not have GIS layers that define your administrative subdivisions, then no problem. The service that queries the GIS layers for information will not fire, and your users can manually key in this information just like any other attribute captured in the HIP data entry forms. Conversely, if you do use this feature, you can still override spatially captured attributes by writing over them manually within the Administrative Subdivision form.
If you wish to take advantage of this feature, it will be necessary to import your GIS data into the overlays table with valid data. The overlays table contains the following columns:
overlayty (string) - Identifies the type of administrative subdivision that the geometry represents. For the spatial capture functionality to work, the value stored here must be consistent with the prefLabel of a concept from the Administrative Subdivision authority document. This value will populate the ADMINISTRATIVE_SUBDIVISION_TYPE node whenever the service is executed.
overlayval (string) - This is the value that will populate the ADMINISTRATIVE_SUBDIVISION node whenever the service is executed. For reference, ADMINISTRATIVE_SUBDIVISION is a non-constrained text field in Arches.
geometry (geometry, 4326) - We expect that overlay records will be polygons and they must be stored in EPSG 4326
overlayid (uuid NOT NULL) - This is the unique ID for the record within Arches. Arches will populate this automatically unless you pass in your own UUID values.
The overlays table is intended to contain data for all administrative subdivisions. As such, if you have more than one overlay type (as indicated in the overlayty column), then it is likely that you will have overlapping polygons in your overlays data.
To populate the overlays table, use the following steps:
1> Prepare a polygon shapefile that mimics the structure of the overlays table as defined above. Remember, the shapefile need not contain an overlayid column, the geometry must be set of EPSG 4326, and the geometry data will not be explicitly called out in the attributes of the shapefile.
Tip
You can access an empty template shapefile that will easily populate into the overlays table from the repo here: ...HIP\docs\overlays template shapefile.zip or click Shapefile.zip to download.
2> Use the PostGIS Shapefile Import/Export Manager to append the shapefile records to the aux.overlays table. Configuration of the import is pictured below:
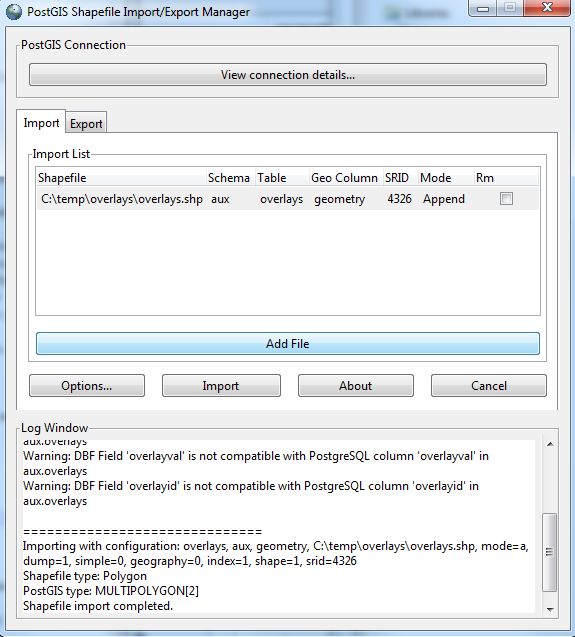
- Please take special note of the following:
- Mode is set to append
- SRID is set to 4326
- Schema is set to “aux”
If you made a mistake in loading the data, you can delete the records with this sql command: “delete from aux.overlays;” and then re-run the PostGIS Shapefile Import/Export Manager tool.