Extra
Production Configuration
When it comes to setting up your app in a production environment, there are a lot of configuration modifications that can be made to optimize the way it is hosted and served. Here’s some information on some things we’ve tested out...
Migrating Your Local App to AWS EC2
Introduction
If you’ve been doing your Arches development work locally, on a laptop or desktop computer, you will eventually need to transfer your app to a remote server of some kind in order for it to be served through the internet. This can be done in many different ways, and in this section we’ll give a thorough explanation of how to use AWS EC2 with Arches in a very basic way. Please look elsewhere for guidance on server administration and maintentance.
Prerequisites
A few components must be in place before you are ready to complete these steps.
You will need an AWS account, which is just an extension of a normal Amazon account. Here’s some information on how to get started with AWS. Do not worry about pricing; if you are new to AWS you will be able to do everything listed below for less than $1.
You’ll need an SSH client in order to access your remote server’s command console. We recommend PuTTY as an easy to use, light-weight SSH client. While downloading PuTTY, also be sure to get its companion utility, PuTTYgen (same page).
You’ll need an FTP client in order to transfer files (your Arches app customizations) to your server. We recommend FileZilla.
Note
Advanced users may forego using an FTP client and do all their file transferring by using a GitHub repo to store and maintain their app. This is a much more streamlined method, but has a steeper learning curve.
Once you have an AWS account set up, and PuTTY/PuTTYgen and FileZilla installed on your local computer, you are ready to begin.
#1. Create an EC2 Instance
From your AWS account console, navigate to the EC2 section. You should get to a screen that looks something like this:
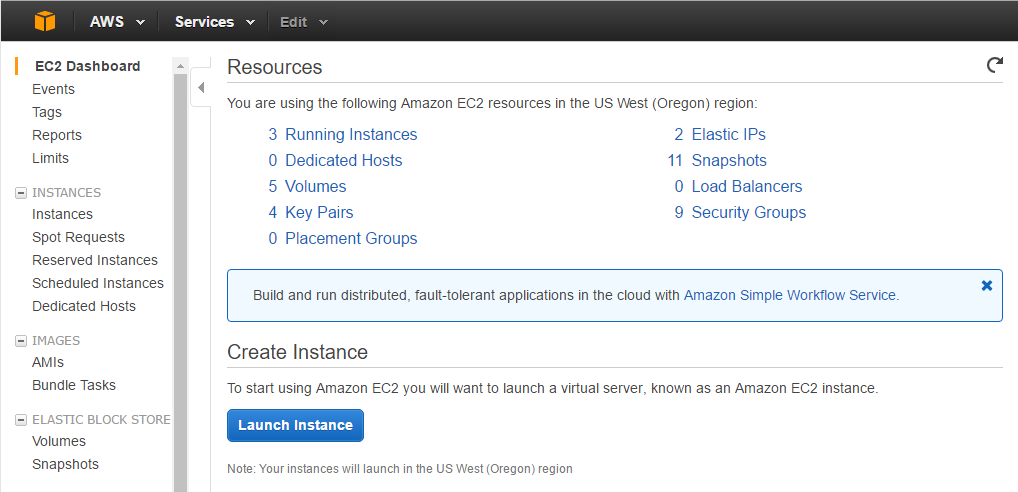
Click on “Launch Instance”
You now have the opportunity to customize your instance before you launch it, and you should see seven steps listed across the top of the page. For our purposes, we only need to worry about a few of them:
- In Step 1, choose “Ubuntu Server 14.04 LTS” as your operating system
- In Step 2, choose t2.micro for the instance type (because it will be free for you)
- In Step 5, tag your server with a name (this is helpful, though not necessary)
- In Step 6, you’ll need to:
- Select “Create a new security group”
- Name it “arches-security”
- Modify the rules of this security group to match the following
| Type | Protocol | Port Range | Source |
|---|---|---|---|
| HTTP | TCP | 80 | Anywhere (0.0.0.0/0) |
| Custom TCP Rule | TCP | 8000 | Anywhere (0.0.0.0/0) |
| SSH | TCP | 22 | My IP |
- In Step 7, click Launch
When you launch the instance, you will be asked to create a new key pair. This is very important. Name it something like “arches-keypair”, and download it to an easy-to-access location on your computer. You will use this later to give the SSH and FTP clients access to your server. Do not misplace this file.
Once you have launched the instance, click “View Instances” to see your running (and stopped) EC2 instances. The initialization process takes a few moments, so we can leave AWS alone for now and head to the next step.
Note
Your Security Group is the firewall for your server. Each rule describes a specific type of access to the server, through a specific port, from a specific IP address. Never allow access through port 22 to any IP but your own. If you need to access your server from a new location (coffee shop, school) you’ll need to update the SSH security rule with your new IP address.
#2. Convert your AWS .pem Key Pair to a .ppk Key Pair
PuTTY uses key files in a different format than AWS distributes by default, so you’ll have to make a quick conversion:
- Open PuTTYgen
- Click Load
- Find the .pem file that you downloaded when launching your instance (you may have to switch to “All Files (.)”)
- Once loaded, click Save
- Ignore the prompt for a passphrase, and save it with the same name as your original .pem file, now with the .ppk extension.
#3.Connect to your EC2 Instance with PuTTY
Now go back to AWS, and look at the status of your server instance. By now, it probably says “2/2 checks passed” in the Status Checks column, and you should have an address (xx.xx.xx.xx) listed in the Public IP column. It’s ready!
- Open PuTTY, and enter your server’s Public IP into the Host Name bar. Make sure Port = 22, and the Connection Type is SSH (remember the security rules we were working with?).
- To make PuTTY aware of your key file, expand the SSH section in the left pane, and click on Auth. Enter your .ppk file as the “Private key file for authentication”.
- Once you have the IP Address and key file in place, click Open.
- Click OK to trust the certificate, and login to your server as the default user
ubuntu - If everything goes well you should be greeted with a screen like this:
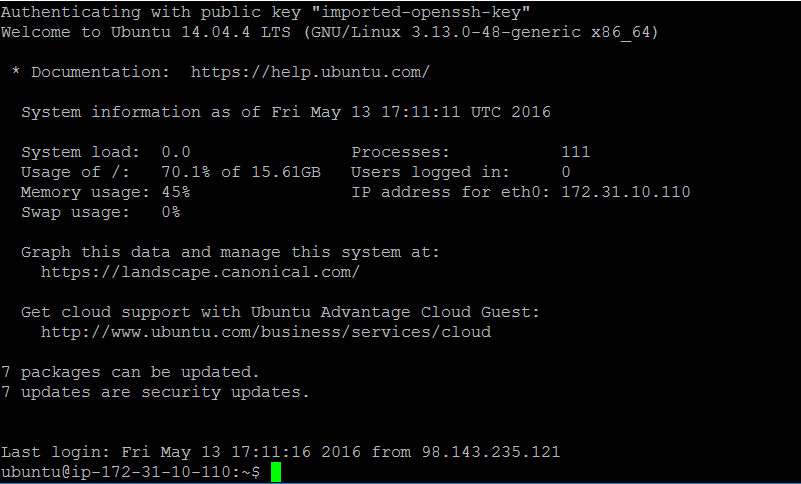
Congratulations! You’ve successfully navigated your way into a functional AWS EC2 instance.
#4. Install Arches Dependencies on your EC2 Instance
Now that you have a command line in front of you, the next few steps should be very familiar. Luckily, if you are coming from Windows, you’ll find that installing dependencies on Ubuntu is much, much easier. Do all of the following from within the /home/ubuntu directory (which shows as ~ in the command prompt).
Download the install script for dependencies:
$ wget https://bitbucket.org/arches/arches3/raw/4f8ffdafb043cf2f6ad009d4738e94202eb529dd/arches/install/ubuntu_trusty_setup.sh
Run it (this may take a few minutes):
$ source ubuntu_trusty_setup.sh
Download the pip install script:
$ wget https://bootstrap.pypa.io/get-pip.py
Run it:
$ sudo python get-pip.py
#5. Install Arches and Arches-HIP on your EC2 Instance
Once you have installed all of the Arches dependencies on your server, you should refer back to this documentation to complete your Arches installation. However, be sure to stop before step #5, because at that point you will be transferring your existing HIP customizations.
As noted, you should end up with this file structure:
/home
    /ubuntu
        /Projects
            /ENV
#6. Connect to your EC2 Instance with Filezilla
To transfer files from your computer to your EC2 instance, you’ll need to use an FTP client. In this case we’ll use FileZilla.
First, we’ll need to set up the authentication system to be aware of our AWS key file.
- Open FileZilla
- Go to Edit > Settings > SFTP and click Add key file...
- Navigate to your .ppk file, and open it. You’ll now see you file listed.
- Click OK to close the Settings
Next, you can use the “Quickconnect” bar:
- Host = your server’s Public IP
- Username = ubuntu
- Password = <leave blank> (that’s what the .ppk file is for)
- Port = 22
Once connected, you’ll see your server’s file system on the right side, and your local file system on the left. Find your local “my_hip_app” directory, and copy the entire directory to /home/ubuntu/Projects/.
Use this command to remove the elasticsearch installation from your new app on the server (because ElasticSearch should be _reinstalled_ on on your server):
(ENV)$ sudo rm -r my_hip_app/my_hip_app/elasticsearch
Note
ElasticSearch is already installed within your local app, but that installation should not be transferred from your local machine to another operating system and expected to function properly. It may be easier to exclude this directory from the FTP transfer.
Now you can run these final commands from the /home/ubuntu/Projects/my_hip_app directory to complete your app’s installation on the server:
Install ElasticSearch:
(ENV)$ python manage.py packages -o setup_elasticsearch
Run ElasticSearch:
(ENV)$ my_hip_app/elasticsearch/elasticsearch-1.4.1/bin/elasticsearch -d
Install the app:
(ENV)$ python manage.py packages -o install
Run the devserver:
(ENV)$ python manage.py packages runserver 0:8000
Note
You may need to have different values in your settings.py file once you have transferred it to a new operating system (GDAL_PATH, for example). To manage this, use a different settings_local.py file on each installation
You should now be able to open any web browser and view your app by visiting your IP address like so: http://xx.xx.xx.xx:8000. Now that you have transferred your app to a remote server, its time to use a real production-capable webserver like Apache to serve it (that’s how we can get rid of the :8000 at the end of the url).
Serving your Arches App with Apache
Introduction
During production, it’s easiest to use the Django webserver to view progress on your app. However, once you are ready to put the app into production, you’ll have to use a more efficient webserver like Apache. Apache is very easy to install and configure. The following works for Ubuntu 14.04, minor changes may be necessary for a different OS.
Note
Once you are serving your app with Apache, you will need to restart Apache every time you make a change to a .py file. Use this command:
$ sudo service apache2 restart
Installation
Get apache2 and the wsgi mod:
$ sudo apt-get install apache2
$ sudo apt-get install libapache2-mod-wsgi
Configuration
In order to properly configure Apache, we must:
- Create daemon process: make python-path to app and to the python virutal environment
- Set the path to your app’s wsgi.py file and reference to the python daemon process created above
- Give apache access to the necessary directory
All of these tasks are handled in the sites-enabled configuration file. Use this command to open it in a text editor:
$ sudo nano /etc/apache2/sites-enabled/000-default.conf
and under <VirtualHost *:80> paste the following code:
WSGIDaemonProcess arches python-path=/home/ubuntu/Projects/my_hip_app:/home/ubuntu/Projects/ENV/lib/python2.7/site-packages
WSGIScriptAlias / /home/ubuntu/Projects/my_hip_app/wsgi.py process-group=arches

<Directory /home/ubuntu/Projects/my_hip_app/>
        Options Indexes FollowSymLinks
        AllowOverride None
        Require all granted
</Directory>
Use ctrl+x to save the file.
We must also give Apache permission to modify one of the app’s log files:
$ sudo chgrp www-data /home/ubuntu/Projects/my_hip_app/my_hip_app/logs/application.txt
Restart Apache:
$ sudo service apache2 restart
You should now be able to view your app from any web browser by nagivating directly to your IP address.
Storing Uploaded Files on AWS Simple Storage Service (S3)
About S3
Amazon Simple Storage Service, or S3, is one of the many services available through Amazon Web Services. S3 can very basically be described as a limitless (for all practical purposes) external hard-drive in the cloud. It’s a simple system that is secure and also cheap. To read more about S3, check out the official documentation.
To use S3, you will need an AWS account, which is just an extension of a normal Amazon account. Here’s some information on how to get started with AWS.
Why Use S3 with Arches
By the time you are in a production environment, you will have configured Arches with a web server, such as Apache or nginx. While you need a web server to serve the app itself, there are two pieces of the app that can be separated from the web server and served independently. These are the ‘static’ files (the css, javascript, and logos that are used throughout the app) and the ‘media’ files (any user uploaded files, such as images or documents).
Many of the existing tutorials are concerned with serving both static and media files, because the more load you can take off of your web server the better. However, there are some advantages to S3 that do not have to do with giving your web server some relief:
- S3 is cheap: As per the price chart, it costs just $.03 per gb/month. So a database with 10gb of photos will have a media storage cost of $3/month, plus a small amount per transaction ($0.004 per 10,000 GET requests, e.g.).
- S3 is scalable: You only pay for the amount of data you have stored, and you have no real limit on how much you can store. This allows for an Arches deployment on a small server, either in-house or a small AWS EC2 or DigitalOcean instance to store hundreds of gigabytes of media–photos, audio, video, documents–without having to restructure to accommodate more data.
The main potential drawback is transfer speed to and from the S3 bucket, but that depends most on your what your default storage option is. If you look around, you’ll find some comparison articles like this one that may be helpful.
Note
You should be able to use S3 regardless of where your app is hosted, whether on an internal server, an AWS EC2 instance, a DigitalOcean droplet, etc.
Warning
We’ve found that by following the steps below, deleting an Information Resource will not automatically remove the file from your S3 bucket. You can manually delete files from the bucket for now, or the intrepid developer may check out the answer to this question on the Arches forum.
Steps to Follow
Having worked through a number of existing tutorials (mostly here, here, here, and here), we’ve distilled these steps to show how you can use S3 in conjunction with your Arches app. Before beginning, you will need to have set up and logged into your AWS account.
#1. Create some new user credentials for your Arches app
The first step is to create some new AWS credentials that your Arches app will use to access the S3 bucket
- Access the AWS Identity and Access Management (IAM) Console
- Create a new user (named something like “arches_media”), and download the new credentials. This will be a small .csv file that includes an Access Key ID and a Secret Key.
- Also, go to the new user’s properties, and record the User ARN
#2. Create a new bucket on S3
Next, you’ll need to create a new bucket and give it the appropriate settings.
Create a bucket, named something like “your-app-media”
In the new bucket properties, under Permissions, create a new bucket policy with the following text, inserting your own BUCKET-NAME, and the User ARN for your new user:
{
    "Statement": [
        {
          "Sid":"PublicReadForGetBucketObjects",
          "Effect":"Allow",
          "Principal": {
                "AWS": "*"
             },
          "Action":["s3:GetObject"],
          "Resource":["arn:aws:s3:::BUCKET-NAME/*"
          ]
        },
        {
            "Action": "s3:*",
            "Effect": "Allow",
            "Resource": [
                "arn:aws:s3:::BUCKET-NAME",
                "arn:aws:s3:::BUCKET-NAME/*"
            ],
            "Principal": {
                "AWS": [
                    "USER-ARN"
                ]
            }
        }
    ]
}
Also, make sure that the CORS configuration (click “Add CORS Configuration”) looks like this:
<CORSConfiguration>
    <CORSRule>
        <AllowedOrigin>*</AllowedOrigin>
        <AllowedMethod>GET</AllowedMethod>
        <MaxAgeSeconds>3000</MaxAgeSeconds>
        <AllowedHeader>Authorization</AllowedHeader>
    </CORSRule>
</CORSConfiguration>
#3. Update the Virtual Environment
In order to configure Arches to use your new bucket, you need to install a couple of extra Django modules in your virtual environment. These will augment Django’s flexibility in how it stores uploaded media.
Once you have activated your virtual environment, use this command:
(ENV) $: pip install boto django-storages
#4. Update settings.py
Finally, you need to tell your app to use these new modules, give it the necessary credentials, and tell it where to store (and find) the uploaded media. Open the your settings.py file...
Find the line that defines the settings “INSTALLED_APPS” and add ‘storages’ to it. It should look like this:
INSTALLED_APPS = INSTALLED_APPS + (PACKAGE_NAME,'storages',)Next, add the following lines, replacing the AWS settings values with information from earlier steps (remember the “credentials.csv” file you downloaded?):
DEFAULT_FILE_STORAGE = 'storages.backends.s3boto.S3BotoStorage'
AWS_STORAGE_BUCKET_NAME = 'aws_bucket_name'
AWS_ACCESS_KEY_ID = 'aws_access_key_id'
AWS_SECRET_ACCESS_KEY = 'aws_secret_access_key'
S3_URL = 'http://%s.s3.amazonaws.com/' % AWS_STORAGE_BUCKET_NAME
MEDIA_URL = S3_URL
Restart your web server.
You should be good to go! To test, create a new Information Resource in your installation and upload a file. Now go back to check out your S3 bucket through the AWS console. Your file should show up in a new folder called files within the bucket. If you are encountering issues, be sure to let us know on the forum.
Converting to .arches / .relations
From MS Excel Workbook
It’s fairly common for legacy data to be stored in an Excel workbook. Or, perhaps it will be easier for you to aggregate multiple existing data sources into a single workbook. Although MS Excel is not the friendliest program to work with, we’d like to provide the following steps to assist with this specific conversion process. (If you are using an MS Access or MySQL database, the query in the Using SQL section should be useful.)
Using SQL
One way to convert your data is to use tools already included in MS Excel. To show you the basic steps of this process, we’re going to take a simple spreadsheet–with columns for resource ID, resource name, and spatial coordinates–and turn it into a .arches file. When you are ready to add attributes and make more complex resources, you should be able to work from these building blocks. Be sure to read up on the .arches format in the Arches Documentation before continuing.
Note
Most of the action here takes place in MS Excel, which you already have, but the final step will be achieved with Notepad++–a lightweight but super powerful text editor. Download and install it now or whenever you get to the later steps. In fact, we highly recommend it for all of your other Arches work as well!
#1. Standardize Your Data
For this example, we’re using a very basic spreadsheet that looks like this:
| id | name | nametype | lat | long |
|---|---|---|---|---|
| 1 | 119 Sidney | NAME_TYPE:1 | 31.75357 | -93.08813 |
| 2 | 135 Sidney | NAME_TYPE:1 | 31.75359 | -93.08825 |
Later steps depend on these specific column names, so if you are following along, make sure that yours match (case-sensitive). Also, make sure that your original lat/long coordinates use the WGS84 datum. If you need a refresher on what NAME_TYPE:1 means, be sure to go check out all of the available documentation on Controlled Vocabularies.
#2. Run a SQL Query in MS Excel
Once you have your data in columns and headers that match the example above, save your workbook. Now you’re ready to to use a SQL query to convert it to the .arches format.
Open MS Excel (2010), click on the Data tab, click From Other Sources, and choose From Microsoft Query.
For Data Source, choose Excel Files and click OK.
Navigate to the workbook with your data (even if you already have it open), select it, and click OK.
Select the sheet that your table is in, and click > to add all of the columns from that sheet.
Click Next three times, until you are given the option to “View data or edit query in Microsoft Query”. Select this option, and click OK. You should see, in the Microsoft Query window, a reproduction of your original table. Now let’s modify it.
Click the
button, and you’ll be presented with the simple SQL query that is being used to create the currently visible table. Don’t remove it just yet. Paste the following text in below it:
SELECT
    id AS RESOURCEID,
    'HERITAGE_RESOURCE.E18' AS RESOURCETYPE,
    'NAME.E41' AS ATTRIBUTENAME,
    name AS ATTRIBUTEVALUE,
    'group1' AS GROUPID
FROM `your\path\here\workbook.xlsx`.`Sheet1$` `Sheet1$`
UNION ALL
SELECT
    id,
    'HERITAGE_RESOURCE.E18',
    'NAME_TYPE.E55',
    nametype,
    'group1'
FROM `your\path\here\workbook.xlsx`.`Sheet1$` `Sheet1$`
UNION ALL
SELECT
    id,
    'HERITAGE_RESOURCE.E18',
    'SPATIAL_GEOMETRY_COORDINATES.E47',
    'POINT (' & long & ' ' & lat &')',
    'group2'
FROM `your\path\here\workbook.xlsx`.`Sheet1$` `Sheet1$`
ORDER BY RESOURCEID, GROUPID;
As you can see, you need to enter the path to your own workbook and reference the correct sheet. To do this, copy the original
FROMstatement, and use it to replace the three newFROMstatements. Now delete the entire original query, so that all you have is the modified code from above.
- Click OK. If you get errors, troubleshoot by double-checking the following:
- Are your field names exactly the same as in the example table above?
- Did you update the path to your own workbook and reference the correct sheet?
- Did you delete the entire original SQL query?
If you have followed all the steps correctly, you should be greeted by a table that looks like this:
| RESOURCEID | RESOURCETYPE | ATTRIBUTENAME | ATTRIBUTEVALUE | GROUPID |
|---|---|---|---|---|
| 1 | HERITAGE_RESOURCE.E18 | NAME.E41 | 119 Sidney | group1 |
| 1 | HERITAGE_RESOURCE.E18 | NAME_TYPE.E55 | NAME_TYPE:1 | group1 |
| 1 | HERITAGE_RESOURCE.E18 | SPATIAL_COORDINATES_GEOMETRY.E47 | POINT (-93.08813 31.75357) | group2 |
| 2 | HERITAGE_RESOURCE.E18 | NAME.E41 | 135 Sidney | group1 |
| 2 | HERITAGE_RESOURCE.E18 | NAME_TYPE.E55 | NAME_TYPE:1 | group1 |
| 2 | HERITAGE_RESOURCE.E18 | SPATIAL_COORDINATES_GEOMETRY.E47 | POINT (-93.08825 31.75359) | group2 |
Look familiar? That is your original data, reformatted to match the .arches schema. As you can see, three rows have been made from each row in our original table. In the SQL query, each new row is defined by a separate SELECT statement. You may notice that a little bit of processing was done in the third SELECT statement to rewrite your lat/long coordinates–they are now formatted as WKT, or Well-known text.
#3. Export and Touch-up
Now that we’ve reformatted the table, we’re ready to export it and make the final changes.
- Click the
button (return data), and choose a blank sheet in your workbook for the output. (Your data may now be styled as a table, which is fine but not necessary.)
- Go to File > Save As... and for “Save as type:” choose Text (Tab delimited) (*.txt).
- Click Save, and when you encounter warnings, choose Yes.
- For the next steps, we’re using Notepad++, as mentioned above. We need to convert the tabs to pipe characters (
|). Open your newly created.txtfile in Notepad++ and use ctrl + F to open the Find/Replace window.- Go the the Replace tab, and enter “Find what:” =
\t, and “Replace with:” =|. Make sure that you have checked the box for Extended Search Mode, and click Replace All. If everything worked correctly, click OK.- For one final check, open the Encoding menu, and make sure that “Encode in UTF-8 without BOM” is selected (select it if it isn’t).
- Now go to File > Save As..., choose this type (at the top of the list): All types (*.*), and name your file
<yourname>.arches. Click Save.
#4. Make a .relations File
You must have a .relations file to accompany your .arches file when you load it into Arches. However, the file need not contain any more than this single line:
RESOURCEID_FROM|RESOURCEID_TO|START_DATE|END_DATE|RELATION_TYPE|NOTES
If you’d like to define some resource-to-resource relationships between the resources in your .arches file, you would do so in the .relations file. You can learn more about this in the Arches Documentation.
To make a .relations file with Notepad++, just open a new blank document, paste in the line shown above, and save it as <yourname>.relations. Your .arches and .relations files must have the same name (e.g., buildings.arches and buildings.relations), and should always be kept together.
Congratulations! You’ve successfully changed a sheet from a standard MS Excel workbook into a .arches/.relations file, and you’re ready to upload it to Arches. You can find guidance on how to do so in the Loading Data section above.